![Copy of STATIC 1.png]](https://help.aptimyz.com/hs-fs/hubfs/Copy%20of%20STATIC%201.png?height=50&name=Copy%20of%20STATIC%201.png)
Logging into the Aptimyz Back Office

- From a web browser, go to:
EU - https://market.eu.aptimyz.com
US/CAN - https://auth.us.aptimyz.com - Login using the email address and password you used to create your Aptimyz store
Dashboard
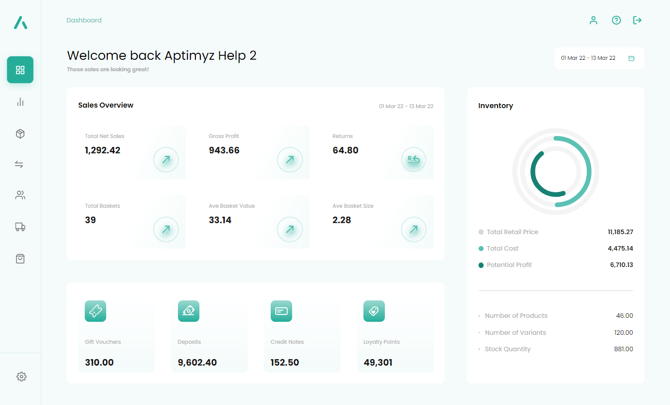
The Dashboard is the Aptimyz Home Page
The date range on the dashboard defaults to Today.
The comparison figures are based on the following time periods
-
- a) Today - same day last week
- b) This Week (week starts on Monday) - last week
- c) This Month (the month starts on 1st) - 1st of last month to the same date, etc
To view figures for a different date range please select a new date range on the date field on the top right of the Dashboard.
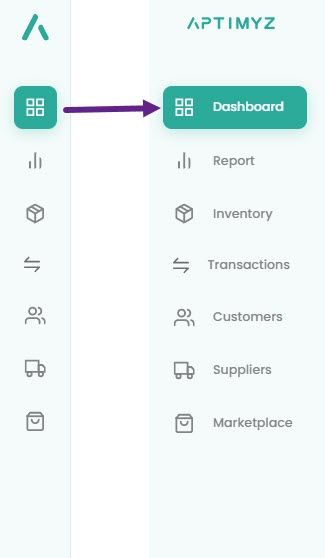
Menu
The Left Hand Menu is responsive, please hover over it to make it move back into the page.As you move across the menu items, sub-menus will appear.
Setup
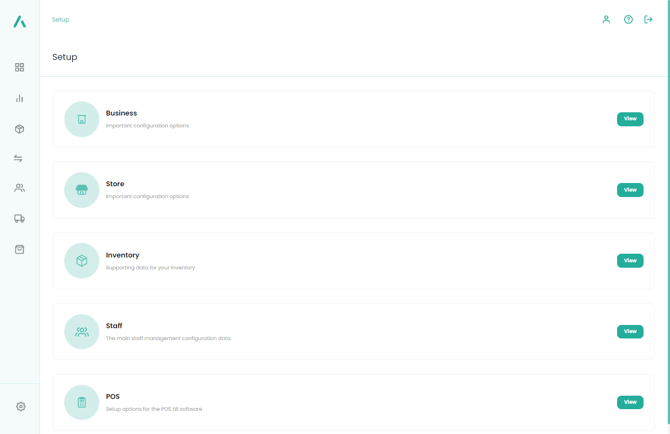
Once you have completed Onboarding, there are a number of key fields that need to be entered using the Setup menu
The Setup menus each have their own Help files, please click on the links or follow the "Return/Back/Continue" links at the bottom of each page.
Mandatory fields in Setup
The following fields are found in various parts of the setup menu and must be completed for the POS system to work correctly.
The more setup pages you complete, the more efficiently your Aptimyz system will function.
Setup > Business Level

Setup > Business > Details
- This page will have been completed in Onboarding
- This page holds the details of your main business premises or head office, if applicable.
Setup > Business > Configuration (optional)
- This feature is only required if you have more than one location in your business.
- The structure of multiple locations can be set up in the Business Configuration process.
Setup > Business > Email Template (optional)
- This feature is only required if you expect to send receipts via email (this does not include receipts from your ecommerce system)
Setup > Business > Tax Rates (Mandatory)
- Mandatory, if you are charging any Taxes on your sales
- If you created your Aptimyz system via Clover, some taxes will be pre-filled.
- If you created your Aptimyz system via Register, you will need to create all relevant Taxes.
Setup > Business > Barcode Labels (optional)
- Your default barcode labels will have been selected during onboarding.
- Use this menu option if you wish to add new templates or copy existing ones and change the placement or the font of the standard templates
- More information can be found in the Barcode Label help pages.
Setup > Business > Gift Cards (optional)
- Use this feature to add standard Gift Card amounts to the Aptimyz system
- When using the POS, a till operator can then sell either a standard pre-set Gift Card or can add a unique value.
Setup > Business > Loyalty Points (optional)
- Only necessary if you use a Loyalty system
Setup > Store Level

Setup > Store > Details
- This page will have been completed in Onboarding
- This page holds the details of your main business premises or head office, if applicable.
Setup > Store > POS Receipts (Mandatory - if not created during Onboarding*)
-
This page may have been completed in Onboarding
-
Please make any adjustments to the different Receipt Templates
Setup > Inventory (Mandatory)
Inventory settings are needed to establish the following:
a) Order number starting sequences
b) Stock Check Mode
c) Assorted POS expiry dates
d) Barcode choices
Setup > Staff > Settings
Your Staff Settings may have been completed during OnboardingSetup > POS > Settings (Mandatory)
POS settings are needed to establish the following:
a) Rules about how the POS is used
b) Information about allowable Discounts
c) Till drawer functionality
d) Enabling Unallocated products
Setup > POS > Quickbuttons (optional)
- Quick buttons are used in the POS as a fast way to add products
- Quick buttons can be created/edited/deleted in the Setup section