![Copy of STATIC 1.png]](https://help.aptimyz.com/hs-fs/hubfs/Copy%20of%20STATIC%201.png?height=50&name=Copy%20of%20STATIC%201.png)
This article includes:
-
Bulk Label Printing
-
Adding to an Existing Print Job
-
Replenish / Adding extra stock quantity and printing the labels
Please read Barcode Label Design for how to change the layout of the labels
If every item requires a separate label (for example: individual items that are brought to the till and scanned into the POS) then we would recommend that each stocked item has an individual barcode label.
If the business operates on large numbers of small items that are not suited to having a label each or large bulk products that cannot be brought to a till, then a laminated sheet of labels at the till may be a better solution.
Bulk Label Printing
1. From the Dashboard, select Inventory> Products
2. Use Search to identify the products you wish to print labels for
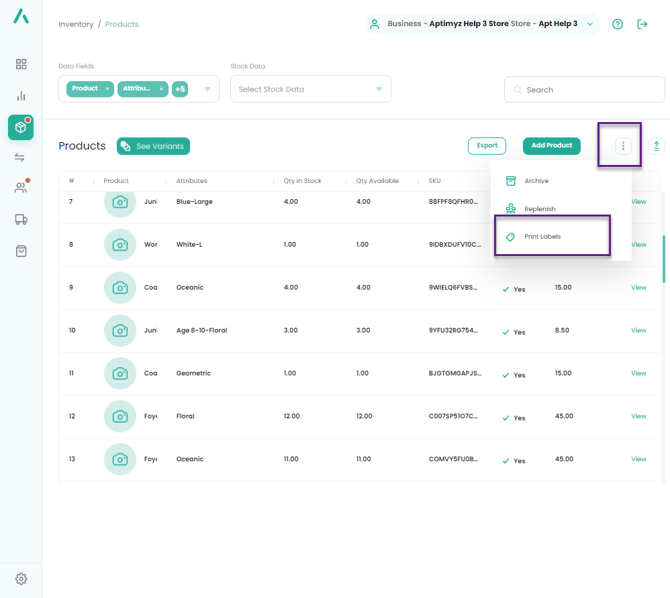
3. Using the 3 dots next to Add Product > Print Labels

4. Select the products that need labels printing
5. Print Labels
6. Using the radio buttons, select the product that you want to print labels for
7. Click Print Labels
8. Set quantities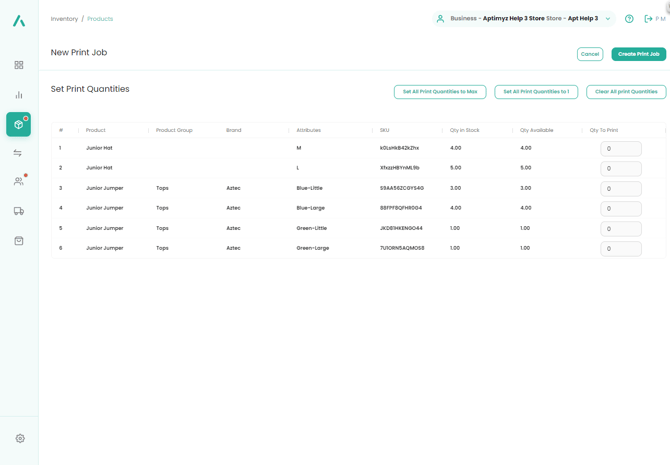
a) Set All Print Quantities to Max – prints out the exact number of stock in hand
b) Set all Print quantities to 1 – Only prints a single label for each Product, irrespective of Stock Quantities
c) Clear All Print Quantities – resets the count to 0
9. Create Print Job
10. Change the Print Label to the type of label you want to print
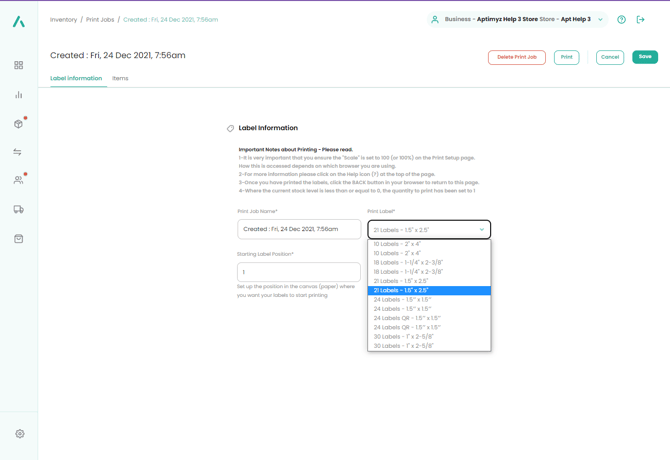
11. Starting Label Position - To minimise waste, you have the option to start printing labels from a different label number. See the diagram below to see the order given to each label
12. The labels are ordered and printed from the top row, first label is top left-hand corner, then the labels are sequential across rows, then down a column at a time.
1, 2, 3, 4
5, 6, 7, 8
9, 10, 11, 12
13, 14, 15, 16, etc
13. Print - This will take you outside the Aptimyz system to a browser print window, showing you the print format. Using your browser print commands, send the labels to your printer. NOTE: You must print your labels at 100%. Each browser has a different way of setting the default size. See Printing Labels from Different Browsers
Adding to an Existing Print Job
- Inventory > Print Jobs > View > Items > Add Items
- Using the Product Search bar at the top - enter a suitable Search string
- Click on the round buttons for each product > Continue
- Set the Print Quantities to Max or to 1 as needed
- Print
Replenish / Adding extra stock quantity and printing the labels
- From the Dashboard, select Inventory> Products
- Use Search to identify the products you wish to print labels for.
- Using the 3 dots next to Add Product > Replenish
- Select the products that need stock replenishment or stock adjustment by clicking on the radio button.

5. Select Replenish
6. Add the extra stock to each stock line.
Replenish will add the extra stock to the stock level already available, it will not overwrite the stock level.
7. Save

8. Register a reason for the replenishment and select Create Labels.
9. Inventory > Print Jobs and find the print job (identifiable by the date and the time) and print your labels
This is the end of the article