![Copy of STATIC 1.png]](https://help.aptimyz.com/hs-fs/hubfs/Copy%20of%20STATIC%201.png?height=50&name=Copy%20of%20STATIC%201.png)
Min Max and Re-order Quantity/Box Size for Purchasing
- The Minimum stock and Maximum stock levels are set at store level.
- The Re-order level/Box Quantity is set at business level.
- To view more information on Purchase Orders, follow this link
Multi location businesses - please note
- When adding a new store, there will be no existing store stock, therefore the records must be created.
- In order to create store stock, the following Min/Max and Quantity imports can be used
- Taxes can be added with both imports
- A user with the correct permissions can create a stock list from the main Business level. See below for instructions on Creating a simple stock report
Adding Min Max in Bulk
-
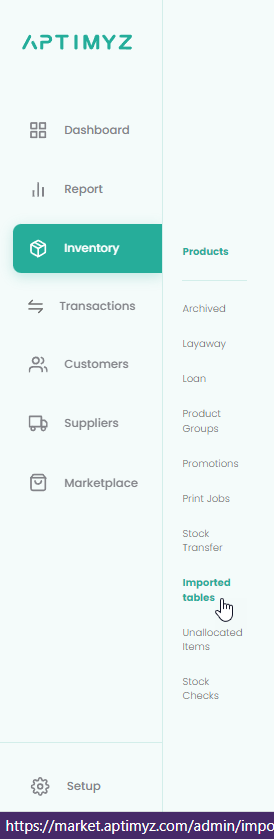
From the Aptimyz Back Office, go to Inventory > Imported Tables
-
Select "Import" > Import Stores Min/Max

-
Download Min Max spreadsheet from here storeminmax.xlsx
-
Fill in the Stock id OR the SKU field
-
Fill in Min Max and Tax Group
-
Save as a CSV UTF-8 file
Creating a simple Stock Report
- Login to Aptimyz Back Office
- From the Main Menu select Report > Inventory
- Create the following report:
Data Fields:
a) Item No
b) Barcode
c) Product
d) Variation
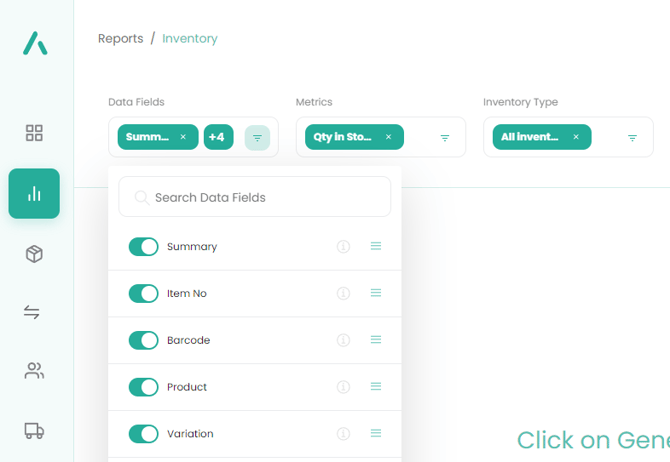
4. Generate Report
5. Export to Excel
6. Once you have identified the products you need in the import file, either copy and paste the Item No column (stock id) or the Barcode column and add the min max entries and tax groups to the import file.
Creating the Import File
- Copy and paste the Barcode over to SKU on the downloaded excel template.
- Enter the Min and Max figures
- Enter the Tax Group as stated within your store settings
- You will then have a file that looks like this:

- Save the file with a name you will remember
- Save the file again, this time using "Save As" and choose the option : CSV UTF-8

- Once you have your completed file, go back to Inventory > Imported Tables > New Import > Select Import Min-Max Product Quantities
- Continue
- Add file or drag or drop your file in to the box

10. Continue
11. Check that you agree with the suggested columns in Aptimyz and select Continue

12. Select Continue > Proceed

13. If there are no errors on the sheet, Import will be highlighted for you to select and import the sheet

14. Import
15. The status will change to 'importing' and show an estimated time for this to complete. You can leave this running in the background and come back to this page at any time to check the status

16. Once completed, the status will show as Done and the results can now be seen within your inventory
