![Copy of STATIC 1.png]](https://help.aptimyz.com/hs-fs/hubfs/Copy%20of%20STATIC%201.png?height=50&name=Copy%20of%20STATIC%201.png)
Gift Card Sale
- Select Menu from the POS screen

- Select Buy Gift Card
a) Either
i. Scan a pre-made Gift Card code (e.g. printed cards in store),
ii. Key in an amount
b) Or, choose an amount from the buttons at the bottom of the screen
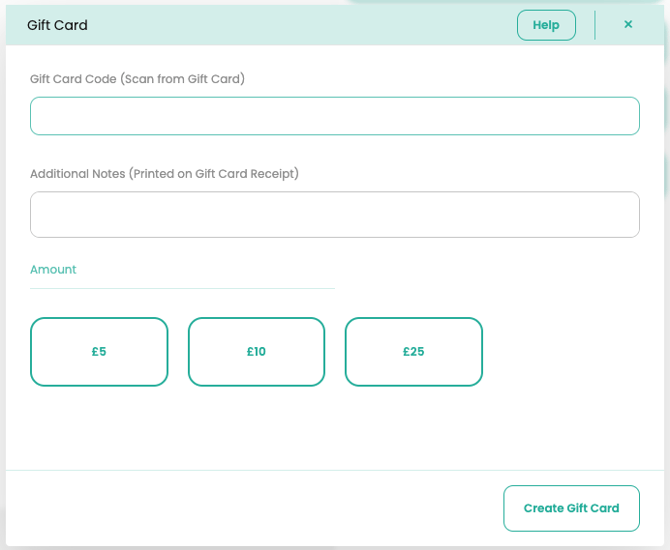
3. Add any Additional Notes the customer would like on the Gift Card (“Happy Birthday Julie” etc)
4. Create Gift Card
Create Credit Note
Used to create manual credit notes only. E.g. when the receipt cannot be found / when returning stock sold pre-Aptimyz / when the barcode cannot be scanned or replicated)
-
Select Menu from the POS screen (bottom right button)
-
Select Create Credit Note

-
Enter amount
-
Enter a note to support the credit note
-
Select Customer if applicable
-
Select Create Credit Note

Search - Gift Card / Credit Note / Layaway
This function allows you to find and reprint a Gift Card or Credit Note if the original is not able to be scanned.
- Select Customer
- Click on the customer to open their contact card

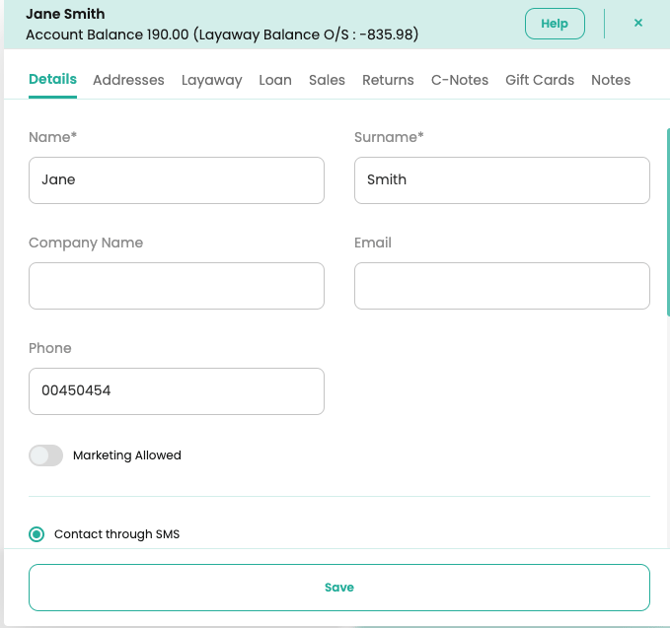
3. Select either Layaway, Loan or Credit Notes to view the information
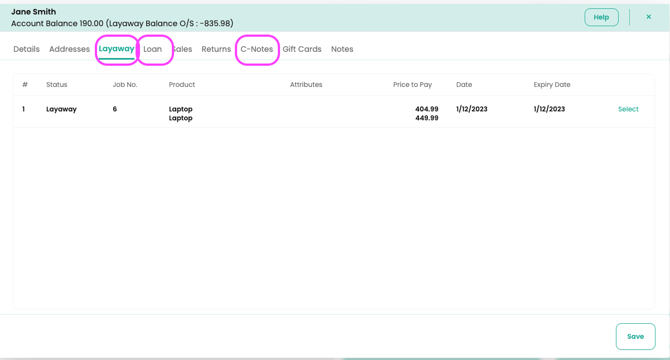
Redeeming a Layaway
- To view details or redeem a Layaway
a) Either: Scan the original Layaway receipt
b) Or, follow the steps above and click 'Select'
2. This will show a detailed screen of the Layaway where you can choose to:
a) Re-Print
b) Change the status
c) or Pay for items
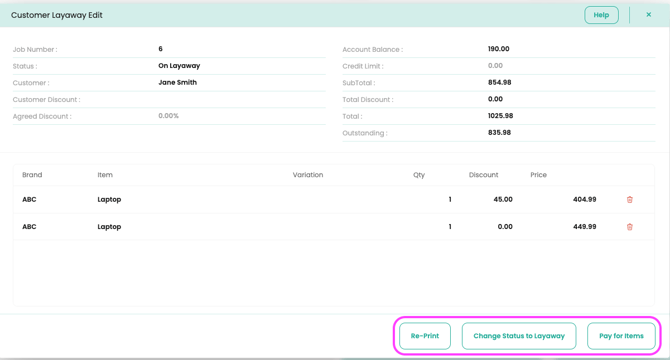
3. When selecting Pay for Items, this will be added to the basket on the main screen. From here you can:
a) Pay by Cash
b) Pay by Card or
c) Checkout >
d) From Points or
e) From Account
Add to Account / Taking a layaway payment
Customer Deposit Account only
Use this option to either build up a deposit account for customers who may need to spend a lot at one time (Christmas or new school year) or to pay for Layaway items in smaller increments.
- From Home > Customer Search then Search or Add Customer
- From Menu Select Add to Account
- Enter amount paid in by customer, Submit
- Pay by Cash or Pay by Card
- Complete Sale
Returns / Refunds - If the customer has a receipt from Aptimyz:
-
Scan the original receipt in the main POS window
-
Choose the item to be returned and Select Return
-
Type in the reason
-
Select Proceed
-
Close the receipt page

-
Refund by one of the following means - either:
a) Exchange item by scanning the barcode of the replacement item
b) Refund – Pay by Cash
c) Refund – Pay by Card
d) Refund – Issue Credit Note
i. Select Checkout
ii. Select Issue Credit Note
7. Finish
Returns / Refunds - if NO receipt is available
- From the POS
- Select Menu > Sales

3. Find the original sale, if possible
4. Select Return
5. This will display the order with return against any line that can be returned
6. Select the Return key
7. Fill out a reason for return
8. Select Confirm
9. Select Close

a) Refund – Pay by Cash
b) Refund – Pay by Card
c) Refund – Issue Credit Note
i. Select Checkout
ii. Select Issue Credit Note
Returns / Refunds - If NO receipt and NO identifiable sale
-
Select Menu
-
Select Returns
-
Scan the barcode of the returned item
-
Select the Return key
-
Fill out a reason for return
-
Select Proceed
-
Select Close
-
Refund by one of the following means - either:
a) Exchange item by scanning the barcode of the replacement item
b) Refund – Pay by Cash
c) Refund – Pay by Card
d) Refund – Issue Credit Note
i. Select Checkout
ii. Select Issue Credit Note
9. Finish
Returns / Refunds - If NO receipt and NO identifiable sale and NO barcode
-
Select Home
-
Select Product Search
-
Select Unallocated
- Please note that by using this method, this will also be added to your inventory as a product
- Please note that by using this method, this will also be added to your inventory as a product
-
Enter Description of product and that it is a refund
-
Quantity = 1
-
Price = the amount of refund (NB: ensure you use a minus before the number)

-
Select Save
-
Refund by one of the following means - either:
a) Exchange item by scanning the barcode of the replacement item
b) Refund – Pay by Cash
c) Refund – Pay by Card
d) Refund – Issue Credit Note
i. Select Checkout
ii. Select Issue Credit Note
9. Finish
Sales
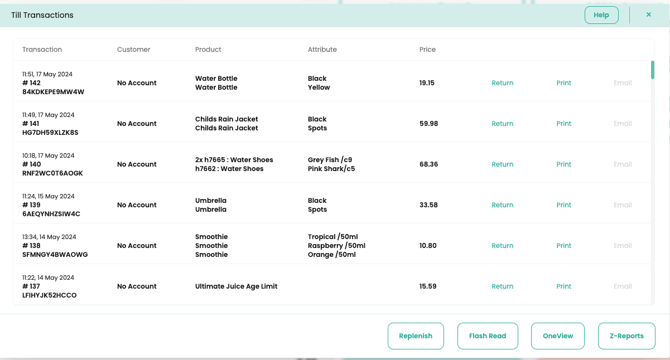
Sales gives the till operator access to previous sales (for returns/reprints)
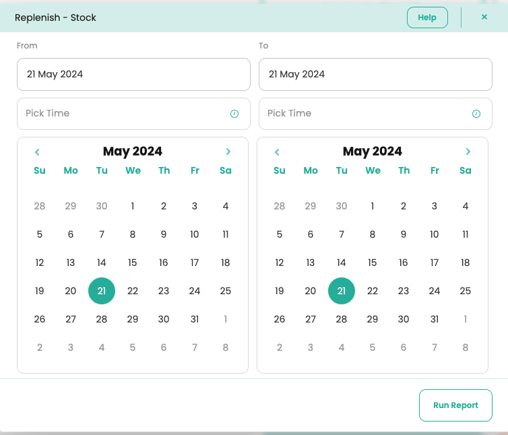
Replenish
Replenish will produce a list on the Till printer of all items sold within the date and time specified
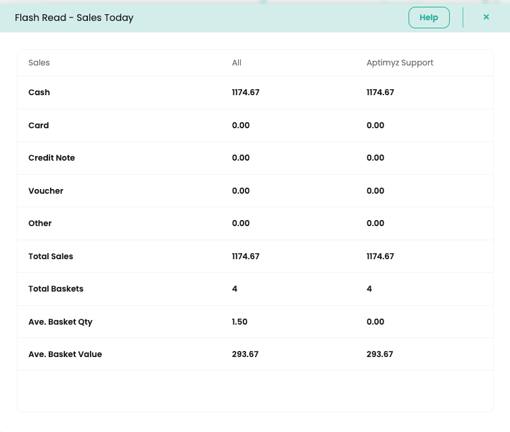
Flash Read
Flash Read displays a summary of the Sales for the day for the Till and for the user logged in.
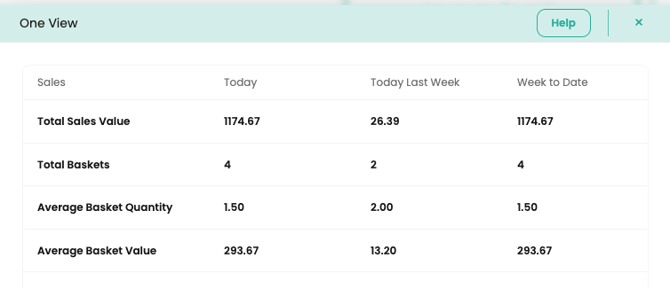
One View
One view is a summary display of Sales Values and Average Basket indicators for Today, Today last Week and Week to Date.
Z-reports
Z-Report will print an immediate Z-report to the till for the Date/Time range chosen
Till Cash - Adding or Withdrawing Cash to the till (Not a Refund or Sale)
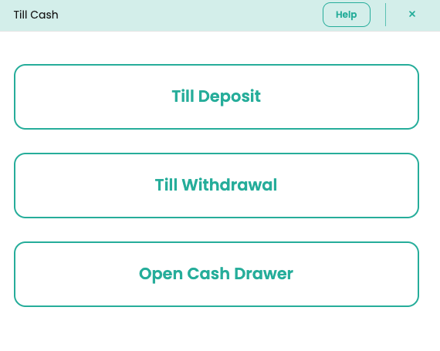
Add Cash to Till
- From Menu
- Select Till Cash
- Select Till Deposit
- Amount
- Comment
- Save
Withdraw Cash from Till
- From Menu
- Select Till Cash
- Select Till Withdrawal
- Amount withdrawn
- Comment
- Copies – defaults to a single print. Would be useful to print 2 if you were paying someone e.g. window cleaner, one for the till drawer and one for the window cleaner.
- Close
Opening the Cash Drawer from the system
- Select Menu
- Select Open Cash Drawer
Retrieving a Parked Sale (a Parked Sale can be retrieved from any Till in store.)
-
Select Menu
-
Select Parked
-
A list of Parked orders will be displayed, select the appropriate order
-
Continue
-
Add further items and complete the sale as above.
Purchases / Transfers
The Transfer feature is only used in Multi-store businesses.
More details can be found in Stock Transfer via POS
The Purchases feature is coming soon
Manual Transaction
For Manual Refunds or Charges
Note: this is a seldom used process, please be aware that manual transactions will be saved as an unallocated product, with no cost associated with it, in the sales reports
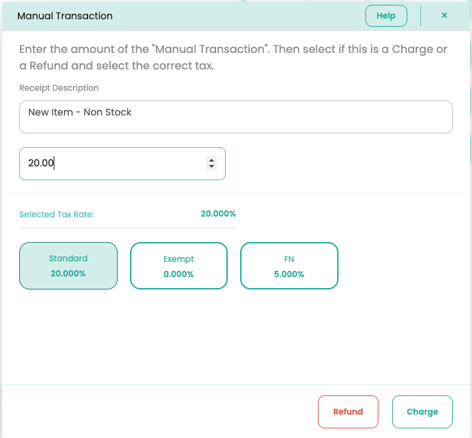
- Select Menu
- Select Manual Transaction
- Fill in a suitable reason why this is a manual transaction
- Enter the full value of the transaction and select the correct Tax rate.
Note: Enter a positive amount only. The system will recognise if the value is negative in the sales reports after completing the next step.
5. Tap on whether this is a charge(sale) or a refund(return)
6. The POS will then display the description, the net, tax and total amounts of the transaction. Please select the checkout method as normal.
Close Till
For normal cash lifts, cash can be withdrawn via the Till Cash process.There is no waiting time or other limitations to closing the till. If necessary, the till can be closed many times during a single day, if trading habits support a closed till.
-
For "end of trading period" till close, please select the Close Till button (in red) on the POS Menu
-
Count the cash and complete the Close till denominations form

-
Select *Close Till', check the amount and correct or accept as necessary
-
The till will then close and the printer will print out a Z-report.
-
Copies of the Z report will also be emailed to the recipients on the Z-report email list.
-
The till must now be "opened" before any sales can be taken.