![Copy of STATIC 1.png]](https://help.aptimyz.com/hs-fs/hubfs/Copy%20of%20STATIC%201.png?height=50&name=Copy%20of%20STATIC%201.png)
Export your Inventory
To export your current inventory from Shopify:
- Go to Products > Inventory.
- Click Export.
- Specify the rows that you want to export.
- Click Export inventory.
Prepare your Import
- Navigate to inventory from the menu on the left hand side
- Select Import Tables
- New Import
- Import Products
- Select > Continue
- Drag and Drop or select file to attach
- Continue
- From this screen, you will need to associate the Shopify columns to Suggested Aptimyz Columns

- Find the Table Row Value / Your Columns and select the Import to Aptimyz box for the data to be imported
- Select the relevant column title for the data to be imported to

Below we have listed the Shopify columns as they appear and which category they should be imported to Aptimyz as.
Shopify > Aptimyz
Title > Product Name

Shopify Product Category will need to be amended within excel for the information to be imported correctly. Apparel & Accessories > Clothing would become Apparel,Accessories,Clothing (no spaces between commas)

Vendor > Supplier Name
Product Category > Categories
Published > Ecommerce Publish This should be entered as Y or N
Option 1 Name > Variation 1
Option 1 Value > Attribute 1
Variant SKU > SKU
Variant Price > Retail Price
Variant Tax Code > Tax Rate (please note that the Tax Rate should be changed on the sheet from 'Yes/No' to the Tax Group Name set up within Aptimyz)

Cost Per Item > Cost Price
Brand Name > A brand name will be required for a successful import. If you do not have brand names saved within your template, please open the CSV file as an excel and add the brand names into any column. This could be your company name for ease but please note, this will show on your inventory and reporting
Quantity > Stock qty > Quantity of stock available in store to sell
11. Once you are happy with the categories, select Continue
12. If there any errors that need to be fixed before importing, these will show here
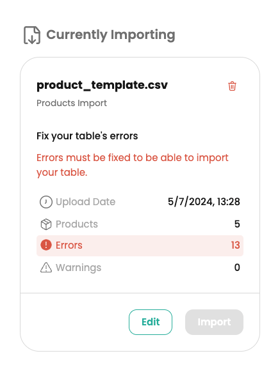 13. Select Edit
Editing your Import
- From this screen, you will be able to check and edit your data before importing
- Check that the suggested columns have matched with the data selected
- If there are any errors that need to be rectified, these will be highlighted in red

- Once the errors have been correct, Save and Confirm
- Import will then be highlighted in green

- Once you are happy with the table, select Import
- Select Proceed
- The status will show as Importing and will run in the background. You can come back to this screen at any time to check the progress

- Once the import is complete, you will receive an email to confirm that this was successful
This is the end of this article